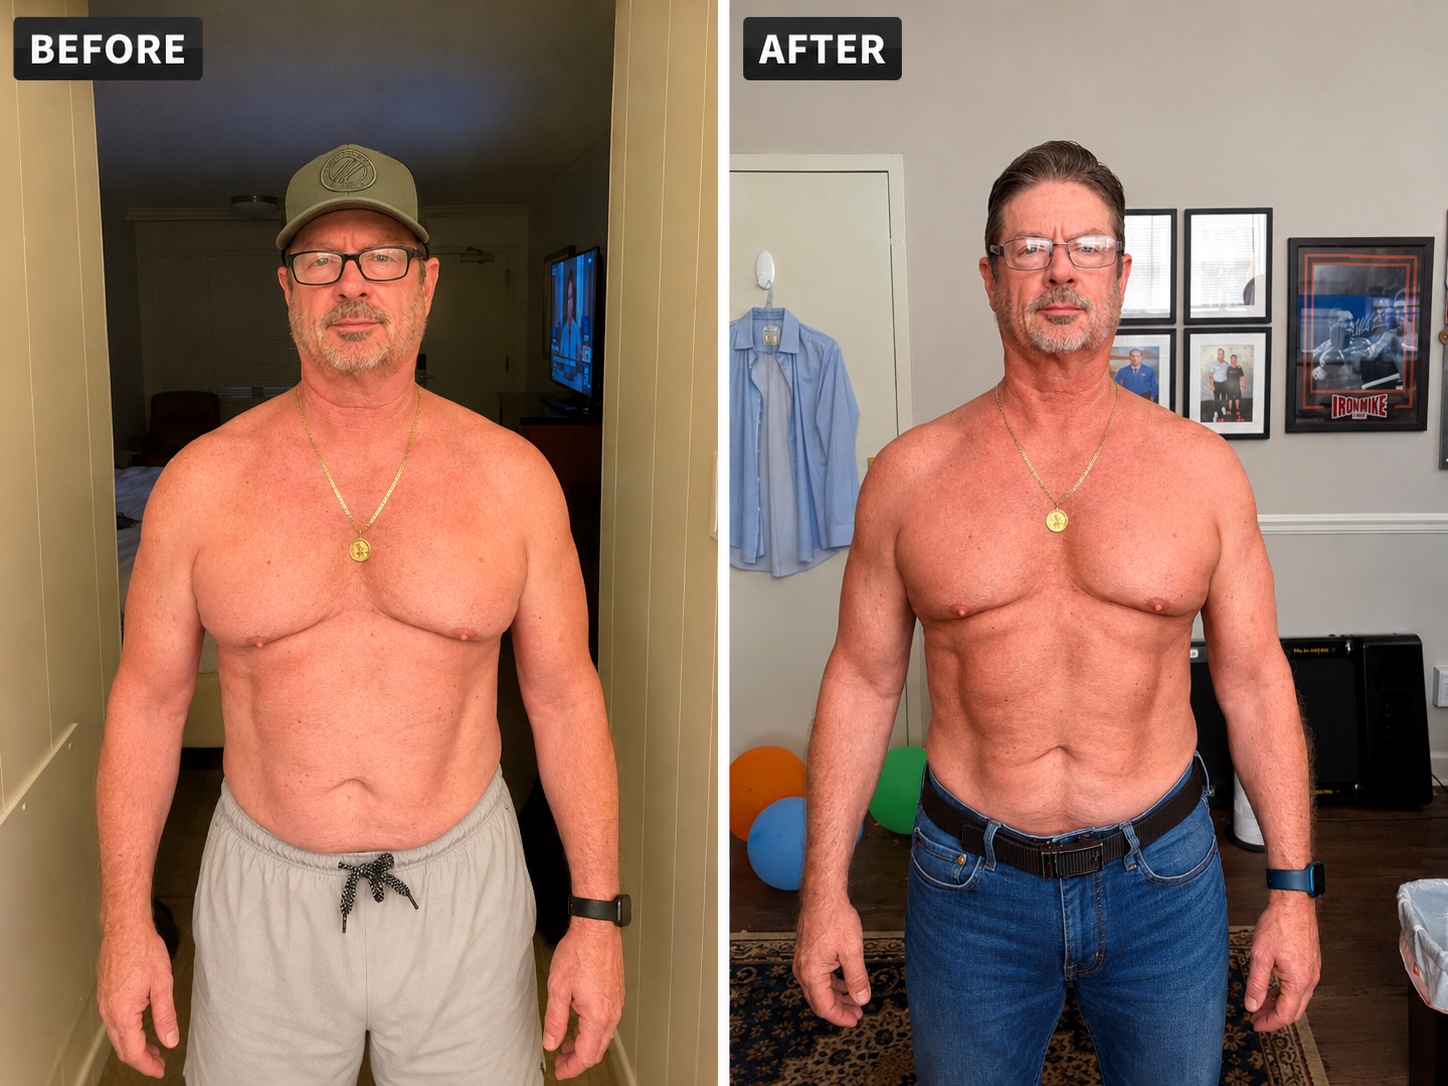
An injury in your fifties isn't a full stop. It's a slower, more deliberate chapter — and plenty of people come out of it stronger than they went in by learning to train around the problem while it heals.
How to "work around it"
The goal isn't to ignore the injury — it's to keep the rest of your body strong while the injured area gets the care it needs. After clearing any movements with your doctor or PT, look for what you can still load pain-free.
Go below or above the injury. A shoulder or bicep issue may leave your legs, hips, core, and the uninjured arm free to train.
Train the healthy side. Unilateral work (single-leg, single-arm) on the unaffected side can preserve strength without stressing the injured tissues.
Protect your conditioning. If your upper body is limited, low-impact cardio like walking, cycling, or lower-body machines can keep your energy and habits intact.
Stay in the rehab lane. Use the pain-guided rules your doctor or PT gives you as the real boundaries — not how you feel on a good day.
This is general guidance, not a replacement for your clinician's restrictions. Always follow the clearance and limits they set for your specific injury.
The comeback story behind this section
A man in his sixties tore up a shoulder and a bicep. For a while, lifting a kettle was the hard part of the day. He didn't try to push the injury harder or wait motionless for it to heal — he trained around it. While the shoulder and bicep recovered slowly, he kept building strength in his legs, core, and the uninjured side under the guidance of his therapist.
The process took roughly two years. No shortcut, no heroic session — just the right work for the phase he was in, repeated until the phase changed. He emerged with more muscle and more strength than in his forties, because he refused to let one injury take his whole body out of the game.
Roughly two years apart — patient, progressive work around the injury.
One story, not a prescription. Talk to a doctor or physical therapist before starting any injury-recovery programme — they know your scan, your history and your timeline.
How the three phases progress
Phase 1 · Weeks 1–4
Early Mobility
Calm things down and get pain-free motion back. No load, no ego.
Pendulum swings daily, 2–3 minutes
Scapular setting, 2 sets of 10, twice a day
Wall slides to your comfortable ceiling, 2 sets of 8
Isometric bicep holds at 30–50% effort, 4 x 20 sec every other day
Move on when: You can move through daily tasks without sharp pain, sleep isn't disturbed, and every drill above is comfortable for a full week.
Phase 2 · Weeks 5–12
Rebuilding Strength
Add light, controlled load and let the tissue adapt — the boring stretch where the comeback is actually made.
Band external rotation, 3 x 12–15, three days a week
Eccentric bicep curls, 3 x 8 with a five-count lower, every other day
Single-arm rows starting absurdly light
Keep wall slides and scapular work as your warm-up
Move on when: Full pain-free range overhead, no next-day joint soreness, and you've held the same routine for four consistent weeks.
Phase 3 · Week 13 onward
Return to Full Activity
Put weight back overhead and rejoin normal training — with the rehab work kept in as insurance.
Seated light shoulder press, 3 x 8–10
Progressive rows and carries
Band external rotation kept twice a week, permanently
Add load in the smallest increment, no more than every two weeks
Move on when: There's no finish line here — the people who stay recovered are the ones who keep two rehab sets in the programme for good.
Injury Recovery exercise library
Grouped by the trouble spots that show up most after 40. Every exercise carries its recovery phase, detailed cues, and a plain list of what counts as normal discomfort versus what means stop.
Please read: General guidance only — not medical advice and not a substitute for clearance from your doctor or physical therapist. If you are recovering from an injury or surgery, get cleared first, then start at the earliest phase even if it feels easy.
Shoulders
The joint that punishes impatience most. Range first, cuff strength second, load last.
GentleInjury RecoveryPhase: Early Mobility
Pendulum Swing
The classic first move after a shoulder setback: it restores gentle motion without asking the shoulder muscles to do any lifting.
A table or chair back to lean on
Shoulders
Form tips
Hinge forward with your good hand resting on a table so the sore arm hangs free.
Let gravity do the work — shift your hips to start the swing, not your shoulder.
Small circles and gentle front-to-back swings, 30–60 seconds each direction.
Keep the arm heavy and relaxed; if the shoulder muscles are gripping, you're driving it.
Common mistakes
Actively swinging the arm with the shoulder instead of letting the body move it.
Making the circles as big as possible on day one.
Holding a weight too early — bodyweight only until it's genuinely painless.
Normal discomfort
A loose, slightly achy pull around the shoulder that fades within minutes.
Mild stiffness at the start of the set that eases as you continue.
Stop if you feel
Sharp or catching pain at any point in the arc.
Pain that lingers more than an hour after you finish.
Pins and needles or numbness travelling down the arm.
Safety & modifications
General guidance, not a substitute for clearance from your doctor or physical therapist. Start with 30 seconds and stay well inside the pain-free range.
GentleInjury RecoveryPhase: Early Mobility
Scapular Setting & Retraction
Before the shoulder can lift again, the shoulder blade has to remember its job. This is the quiet groundwork that makes later strength work safe.
None
ShouldersCore
Form tips
Sit or stand tall, arms relaxed at your sides.
Draw the shoulder blades gently down and back — think 'into your back pockets'.
Hold 5 seconds, release fully, repeat 10 times.
The effort is about a 3 out of 10. This is a skill drill, not a strength set.
Common mistakes
Shrugging up instead of setting down and back.
Squeezing hard enough to arch the lower back.
Holding your breath through the squeeze.
Normal discomfort
A working sensation between the shoulder blades.
Mild fatigue in the upper back after 10 reps.
Stop if you feel
Pinching at the front or top of the shoulder joint.
Neck pain or headache during the set.
Safety & modifications
General guidance, not a substitute for clearance from your doctor or physical therapist. Safe to do several times a day if every rep stays pain-free.
GentleInjury RecoveryPhase: Early Mobility
Wall Slide
Rebuilds overhead range with the wall supporting the arm, so the shoulder relearns the movement before it has to own the load.
A clear wall
Shoulders
Form tips
Forearms on the wall, elbows about shoulder-width and shoulder height.
Slide up only as far as it stays comfortable — halfway is a win early on.
Keep ribs down; don't arch the back to fake extra height.
Slow: three counts up, three counts down, 8–10 reps.
Common mistakes
Chasing full overhead range in the first week.
Shrugging the shoulders toward the ears as the arms rise.
Letting the elbows flare wide off the wall.
Normal discomfort
A stretching sensation through the shoulder and upper back at the top.
Slight tiredness in the shoulder after the set.
Stop if you feel
A sharp pinch in the top of the shoulder as you slide up — stop below that point.
Clunking accompanied by pain.
Safety & modifications
General guidance, not a substitute for clearance from your doctor or physical therapist. Your pain-free ceiling is the rep range — it will rise on its own over the weeks.
ModerateInjury RecoveryPhase: Rebuilding Strength
Band External Rotation
The rotator-cuff workhorse. Light, boring and repeated for weeks — which is exactly why it works.
A light resistance band and a door anchor
Shoulders
Form tips
Elbow tucked at your side with a rolled towel between elbow and ribs.
Rotate the forearm outward only 45–60 degrees, keeping the elbow pinned.
Two counts out, three counts back. 2–3 sets of 12–15.
Use the lightest band that makes the last two reps feel like work.
Common mistakes
Band far too heavy, so the whole torso twists.
Elbow drifting away from the ribs.
Rushing the return — the lowering half is where the tissue adapts.
Normal discomfort
A deep burn at the back of the shoulder by rep 10.
Muscle soreness the next day that settles within 24–48 hours.
Stop if you feel
Sharp pain at the front of the shoulder.
Soreness still climbing 48 hours later — that's too much, too soon.
Any weakness or heaviness that appears mid-set.
Safety & modifications
General guidance, not a substitute for clearance from your doctor or physical therapist. Progress band thickness only after two comfortable weeks at the current one.
ModerateInjury RecoveryPhase: Return to Full Activity
Seated Light Shoulder Press
The graduation exercise — putting weight overhead again, seated and supported, once the range and the cuff are ready.
Two light dumbbells and a chair with a back
ShouldersCore
Form tips
Sit tall against the chair back, feet flat, ribs stacked over hips.
Start with palms facing each other — it's the friendliest angle for a recovering shoulder.
Press only to the height where it stays pain-free, even if that's short of lockout.
3 sets of 8–10, stopping two reps before form would break.
Common mistakes
Arching the back to push a heavier weight up.
Returning to a barbell or behind-the-neck press too soon.
Testing your old pre-injury weight to 'see where you are'.
Normal discomfort
Shoulder and tricep fatigue by the last couple of reps.
Muscle soreness the next day, not joint soreness.
Stop if you feel
Pinching at the top of the press.
The shoulder feeling unstable or like it might 'give'.
Any pain that makes you change how you press.
Safety & modifications
General guidance, not a substitute for clearance from your doctor or physical therapist. Only enter this phase once earlier-phase work has been comfortable for several weeks.
Bicep/Elbow
Tendons answer to slow, repeated, boring load. Weeks, not workouts.
GentleInjury RecoveryPhase: Early Mobility
Isometric Bicep Hold
Loads an irritable bicep or elbow tendon without any movement — often the first thing a grumpy tendon will tolerate.
A light dumbbell, or just your other hand for resistance
Bicep/Elbow
Form tips
Elbow bent to about 90 degrees, tucked at your side.
Push into your other hand (or hold a light weight) at roughly 30–50% effort.
Hold 20–30 seconds, rest a minute, repeat 4–5 times.
Breathe normally the whole hold — no bracing or grimacing.
Common mistakes
Going near maximum effort straight away.
Letting the elbow drift forward or the shoulder do the work.
Skipping the rest between holds.
Normal discomfort
A steady, tolerable ache in the muscle belly during the hold.
A settled, sometimes less painful tendon afterwards — that's a good sign.
Stop if you feel
Sharp pain in the crease of the elbow.
Pain that increases hold over hold rather than staying steady.
Swelling or warmth around the elbow afterwards.
Safety & modifications
General guidance, not a substitute for clearance from your doctor or physical therapist. Tendons respond to patience and repetition, not to one heroic session.
ModerateInjury RecoveryPhase: Rebuilding Strength
Eccentric Bicep Curl
Slow lowering is the classic tendon-rebuilding tool: it lays down strength in the exact tissue that let you down.
One light dumbbell
Bicep/Elbow
Form tips
Curl the weight up with both hands (or the good arm helping).
Lower with the recovering arm alone over a slow count of five.
Start with 3 sets of 8. Weight should feel almost too easy for the first fortnight.
Keep the upper arm still — no swinging from the shoulder.
Common mistakes
Lowering fast, which removes the entire benefit.
Jumping the weight up as soon as it feels easy.
Training it every day — tendons need 48 hours between sessions.
Normal discomfort
A pulling, working sensation through the bicep as you lower.
Mild soreness that has cleared before the next session.
Stop if you feel
A sudden snap, pop or tearing sensation — stop immediately and seek medical advice.
Sharp pain at the elbow or in the shoulder crease.
Pain that worsens across the sets.
Safety & modifications
General guidance, not a substitute for clearance from your doctor or physical therapist. Add load in the smallest increment available, no more than once every two weeks.
Knees
Get full straightening back, then rebuild the quad that guards the joint.
GentleInjury RecoveryPhase: Early Mobility
Terminal Knee Extension
Restores the last few degrees of knee straightening — the range most people quietly lose after a knee problem, and the one that makes walking feel normal again.
A light band anchored at knee height (or none)
Knees
Form tips
Stand with a soft bend in the recovering knee, band pulling it forward.
Straighten the knee fully and squeeze the quad for two seconds.
Keep the heel down and the foot pointing straight ahead.
2–3 sets of 12–15, daily is fine while it stays pain-free.
Common mistakes
Locking the knee back hard rather than squeezing to straight.
Letting the hip do the work by leaning back.
Using a band so heavy the knee wobbles inward.
Normal discomfort
A firm working feeling across the front of the thigh.
Slight stiffness at the very end of range that eases with reps.
Stop if you feel
Sharp pain behind or under the kneecap.
Swelling in the knee the next morning.
The knee giving way or feeling unreliable.
Safety & modifications
General guidance, not a substitute for clearance from your doctor or physical therapist. Knee swelling after a session is the clearest sign you did too much.
Lower Back
Gentle motion beats bed rest. Watch which direction your symptoms travel.
GentleInjury RecoveryPhase: Early Mobility
Prone Press-Up (Back Extension)
A gentle, widely used way to coax an irritable lower back back into extension after a flare-up.
A mat
Lower Back
Form tips
Lie face down, hands under your shoulders.
Press the chest up only as far as comfortable, hips staying on the floor.
Let the lower back and glutes stay completely relaxed.
10 slow reps, holding two seconds at the top.
Common mistakes
Pushing to full straight arms on the first attempt.
Tensing the glutes and lower back through the lift.
Continuing when symptoms spread further down the leg.
Normal discomfort
A pulling or mild ache central to the lower back.
Symptoms moving from the leg toward the back — that's a good direction.
Stop if you feel
Pain travelling further down the leg during or after the set.
Numbness, weakness or pins and needles in the leg or foot.
Any change in bladder or bowel control — seek urgent medical care.
Safety & modifications
General guidance, not a substitute for clearance from your doctor or physical therapist. Not every back responds to extension — if yours doesn't, stop and get assessed.
Hips
Side-hip strength is the first thing lost and the last thing people train.
GentleInjury RecoveryPhase: Rebuilding Strength
Side-Lying Hip Abduction
Rebuilds the side-hip strength that quietly disappears after any hip or lower-limb problem, and that keeps the pelvis level when you walk.
A mat
Hips
Form tips
Lie on your side, bottom knee bent, body in one long line.
Lift the top leg to about 30 degrees with the toes pointing forward, not up.
Lower over three counts. 2–3 sets of 12 each side.
Keep the hip stacked — don't roll backwards to cheat height.
Common mistakes
Rolling the top hip back so the front of the thigh takes over.
Lifting far too high.
Adding ankle weights before the bodyweight version is easy.
Normal discomfort
A burn on the side of the hip and glute by rep 8–10.
Next-day muscle soreness on the outer hip.
Stop if you feel
Sharp pain in the groin or deep in the hip joint.
Pain on the outer hip bone when lying on that side afterwards.
Clicking with pain rather than clicking alone.
Safety & modifications
General guidance, not a substitute for clearance from your doctor or physical therapist. Quality over quantity — stop the set when the hip stops doing the lifting.
Go deeper with Vital Plus
Extra phase-specific drills for every trouble spot, plus the clear criteria for knowing when you've actually earned the next phase — instead of guessing.